Renaming a Series of Files or Folders with the Help of Sources
Suppose, on the one hand, you have a series of files or folders and their names may only be numbered. For example, audio files such as Track1, Track2, Track3 to Track20, video files of a series such as S01E01, S01E02, S01E03 to S01E10 or completely different numberings or other meaningless file names.
On the other hand, you have a text that contains your desired names for the corresponding files or folders. For example, a list of the titles of the audio tracks or an overview of the titles of the episodes of the series. Now you would like to change the existing file names and either insert the titles into the previous file names at a certain place or change the entire file name to the title completely.
But how do the lines of the text come into the file names? Of course, it would be possible to label each file individually, for example with manually writing or at least copying the title text into each individual file name. Depending on the amount of files, this task can be very tedious and it can take a long time. For this reason, in this tutorial, we show you a way how you can do this type of renaming simply, quickly and easily. We use the application FileRenamer for this, which you can see in the following screenshot.
Windows 11 - Windows 10 - Windows 7
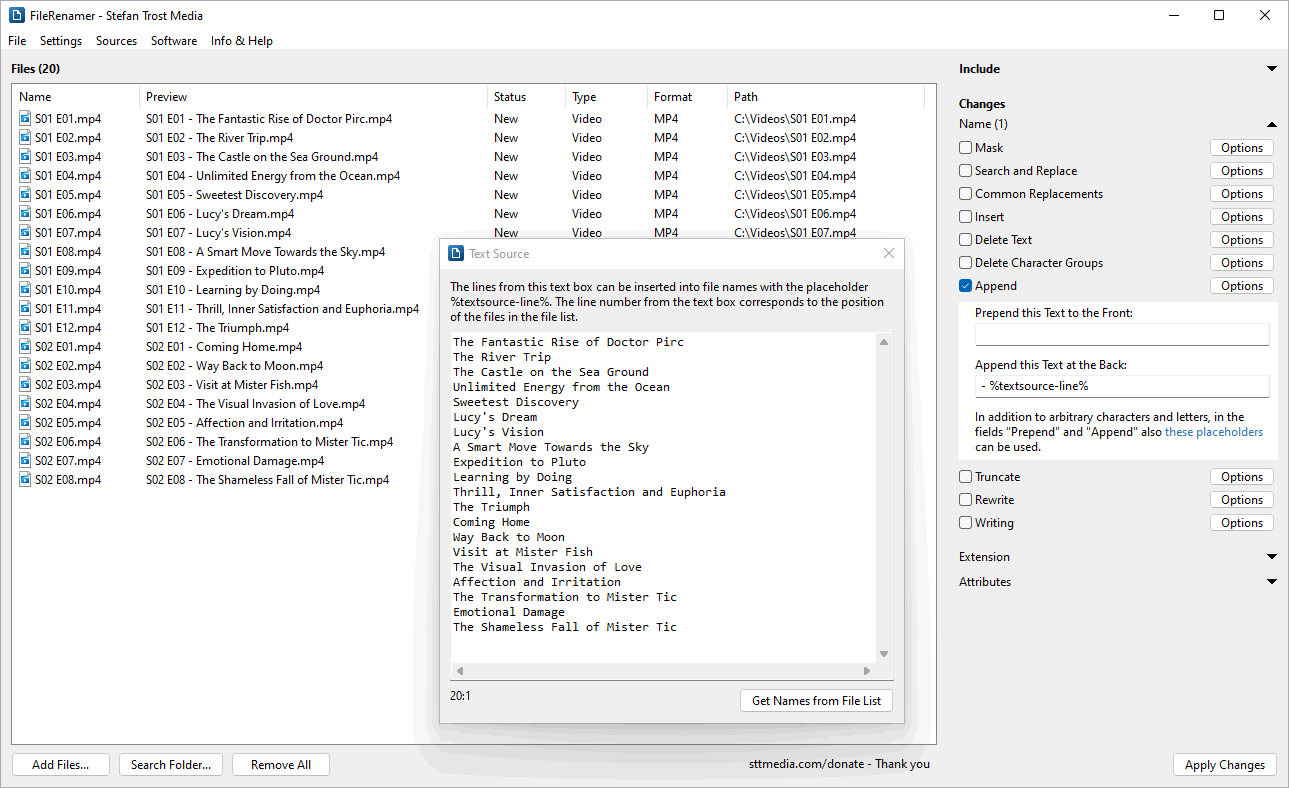
In this example, we use the program to label a series with 20 episodes from 2 seasons. The video files first have numbered file names starting at "S01 E01" up to "S02 E08". We would like to attach the title of the episode to these existing file names and also separate them for better readability with a hyphen from the old file name. You can see the result in the file list of the program for each of the files in the "Preview" column.
Content of the Tutorial
This tutorial is divided into the following sections:
- Short Introduction
- Files and their Order
- Text Source Window
- Definition of Changes and supported Functions
- Preview and Application of Changes
- Application Examples
Short Introduction
Before we look at the individual steps in detail, here is a brief overview of how you can use the function in the FileRenamer:
- Add Files: First, just drag all files or folders you want to rename onto the program. The files will appear in the file list in the main window. Pay attention to the correct order of the files.
- Select Text Source: Next, go to the menu "Sources > Text Source". In this window, you can copy or write the text which should be the basis for the renaming.
- Define Changes: You can configure the renaming on the right of the main window. The placeholder %textsource-line% can be used in the actions Mask, Search and Replace, Insert, Delete Text, Prepend and Append and refers to a line from the text source window. The line number of the text corresponds to the position of the related file in the file list.
- Apply Changes: Before renaming, you should look into the column "Preview" in the file list and check whether your desired new names for the files are there. If so, you can click on the button "Apply Changes" to give the files their new names.
In the following we would like to go detailed into these steps, give examples and explain what there is to consider.
Files and their Order
First, you should add all files and folders to be renamed to the file list in the main window of the FileRenamer. You can use the buttons under the file list or simply drag the files from any folder onto the program. Even if we talk about files here most of the time, you can also use the introduced function for the renaming of folders. Whether files and/or folders should be renamed, can be determined in the top right of the main window under "Include".
Next, you should ensure that the files appear in the list in the correct order. This means that the files should be positioned in the same order in the list as the associated lines in the text. If your files are numbered, for example with names such as Audio01, Audio02, Audio03 and so on, you can simply click on the column header of the column "Name" to sort the files according to their name. You can also move individual files with the mouse within the list.
Text Source Window
The window for entering the text respectively the text lines can be invoked via the menu "Sources > Text Source". In this window you can write or copy the text, that should be the basis for the renaming. Each line in this window corresponds - one line after each other - to a file in the file list. The first line in the text field therefore refers to the first file in the file list, the second line in the text field refers to the second file in the file list and so on. That is why it is so important that on the one hand the files are in the correct order in the file list and on the other hand the text begins and ends with the correct line.
When you click into the text field with the mouse, the current line number of your cursor is displayed under the text field. This information can be helpful for the assignment. With the button "Get Names from File List", you can retrieve the current original file names of all files from the list and write them into the text field. The lines in the text field are filled so that the line numbers of the lines match the list position of the associated files and can thus be reused for the renaming of the original files. With this function you can edit the file names in your file list directly in form of an ongoing text by then using the changed lines back in the other direction for renaming.
Definition of Changes and supported Functions
On the right side of the main window you will find the area "Changes". In this area you can configure the rules according to which your files should be renamed. Simply activate the checkbox of one or more of the functions and use the options and text fields to configure the respective function. You can fetch the lines from the text source window with the placeholders %textsource-line% and %textsource-line,x,y% by simply using these placeholders in the text fields of the functions alone or together with other placeholders, letters or characters. The two placeholders are supported by the functions Mask, Search and Replace, Insert, Delete Text, Prepend and Append.
Depending on the position of a file in the file list, the two placeholders are standing for a different content. For the renaming of the first file from the file list, the two placeholders are standing for the first line from the text field of the text source window. For the second file in the file list, the two placeholders are standing for the second line and so on.
The placeholder %textsource-line% corresponds to the text of the entire line while with using the placeholder %textsource-line,x,y% you are able to adopt only a part - the letters at the positions x to y - from the respective line. As an example, in order to take over only the first 3 letters of a line, you can write %textsource-line,1,3% (letter position 1 to letter position 3).
Preview and Application of Changes
How the file names would change with applying your current settings, you can see live, after each change of the settings, in the column "Preview" of the file list. You should use this column to check whether the correct line of text is assigned to each file and the files are consequently arranged in the correct order in the file list.
If this is the case and you are satisfied with the result, you can simply click on the button "Apply Changes" located at the bottom right of the main window to rename all files in the file list at the same time in accordance with your settings.
Application Examples
Finally, we would like to give you some examples of typical applications of this function.
- The line should become the entire new file name: If you want to completely discard the old file name and the new file name should not consist of any other character except the text from the line, you can use the "Mask" function. In the text field "Mask", just write only "%textsource-line%" to get that result.
- The file name should contain a numbering in addition to the line: This concern is also easiest to reach via the "Mask" function. Simply write "%num% %textsource-line%" into the text field for a simple numbering or "%0num% %textsource-line%" for a numbering with leading zeros. The %num% placeholders stand for continuous numbering within the file list and are explained in the tutorial about the numbering of files and folders together with their options and further examples. Instead of the spaces between the two placeholders, you can also use any other text, for example "%0num% - %textsource-line%" to insert a hyphen between the number and the text from the line.
- Certain characters or text in the old file name should be replaced with the text from the line: If you want to replace a word, several words or some characters in the old file name with the text from the line, you can use the "Search and Replace" function. In addition to the placeholders, both fields can also contain any other characters or other placeholders and you can also use regular expressions to enhance your search to different character patterns. A typical example would be "Search for: abc; Replace with: %textsource-line%" to replace the letters "abc" with the text from the line.
- The line should be inserted at a certain location of the file name: With the "Insert" function, you can insert the text from the line at any character position in the file name counted from the front or from behind.
- The text from the line should be removed from the file name: The placeholder can also be used with the "Delete Text" function and thus you can also go the opposite way. When you enter the placeholder "%textsource-line%" here alone or together with other characters into the text field, the text of the associated line is removed from each file name.
- The line should be attached to the existing file name: This example is shown by the screenshot at the beginning of this tutorial. Simply use the "Append" function and either write only the placeholder or the placeholder together with any text into the text field. For example, " - %textsource-line%" for appending the line to the end of each file name in the file list separated by a hyphen.
- The line should be the new beginning of the existing file name: Also this task can be done with the "Append" function. This time, however, you have to use the field "Prepend this Text to the Front" instead.
- A maximum of x characters should be taken from the line: In the previous examples we have always used the placeholder "%textsource-line%". This placeholder always refers to the entire text from the respective line. Apart from that, with the placeholder %textsource-line,x,y% you can only take over a part of the text from a line. The x stands for the character position of the first character, the y for the character position of the last character, which is adopted from the line. If a line has more characters than y, it is cut off at this point. If a line has fewer characters than y, the line is taken over till its end. We can therefore also use this function to define a maximum number of characters for the takeover. For example, %textsource-line,1,100% to take over a maximum of 100 characters. So it is not necessary for you to shorten the lines manually. Ultimately, the placeholder %textsource-line,x,y% can also be used for all functions presented here in the same way as it is demonstrated for %textsource-line%.
- The text from the line should be used to change the file extension: All previous examples refer to a change of the file name. You can configure this under "Changes > Name". Similar functions are available for changing the file extension under "Changes > Extension". Also in these functions, the placeholders presented here can be used in the same way like for the name.
Of course, you are not only limited to these examples of application in the FileRenamer. You can also combine the placeholders with any other function of the program. The examples should only demonstrate a small overview of some of the possibilities.