First Steps with FasterFiles
On this page, you get a short introduction to FasterFiles. We show you how to set up the application and how to create and execute your first HotKey and your first Action Lists and Actions. This manual is divided into the following sections:
- Create HotKeys
- Create Action Lists
- Create Actions
- Execute HotKey
- Running Faster Files in Background
- Autostart
- Installation
- Language
If you are only searching for the description for a specific auction or function, you should have a look at the page functions. There you can find a list of all functions sorted by their appearance in the software.
Your first HotKey
When starting FasterFiles for the first time, there is no HotKey created yet. In order to create your first HotKey, just click on the button "New HotKey". After that, the following window will open:
Windows 11 - Windows 10 - Windows 7
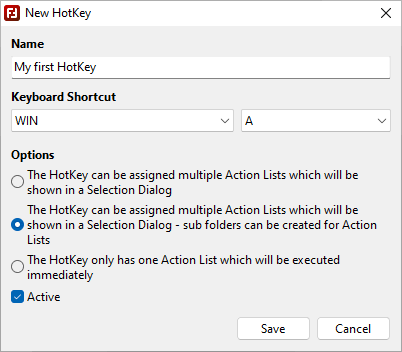
In this window, you can configure your HotKey. First of all, you can select a name for your HotKey and the key combination (keyboard shortcut) that should be used. In the example, we have taken "My first HotKey" as a name and we have selected the key combination WIN + A from the drop down menus. If this key combination will be pressed later, our HotKey will be executed. Please note, that some keyboard shortcuts such as CTRL + C or CTRL + V are used by the operating system so that you cannot use them here.
In the options, you can determine which kind of HotKey you would like to create. If you want to execute all of the assigned actions directly after pressing the keyboard shortcut, you should select "The HotKey has one Action List which will be executed immediately". Alternatively, it is also possible, that a window will be displayed from which you can select the Action List you would like to execute. This window can be styled with or without subfolders. In our example from the screenshot, we want to use the selection window dialog with subfolders for selecting the actions and we have ensured that the option "Active" is enabled so that our keyboard shortcut will be active directly after its creation. Last, you can click on "Save" in order to create your HotKey.
All of these settings can also be changed later. If you only have to right click your HotKey in the list where you can find "Edit" in the context menu.
Your first Action List
Now, we have created our first HotKey. However, so far, we have not defined what should happen when pressing the define keyboard shortcut. We will care about that now.
In FasterFiles there are Actions and Action Lists. An Action is "Open File", "Copy Folder Content" or "Execeute Program", for example. You can find an overview of all actions that are available here. Those Actions can be assigned to Action Lists and thereby grouped to one entity that can be executed by FasterFiles. Each Action List can have one ore multiple Actions so that when executing this Action Lists, all assigned Actions will be performed after each other.
Now, we want to create our first Action List. After creating our first HotKey, the main window is looking like that:
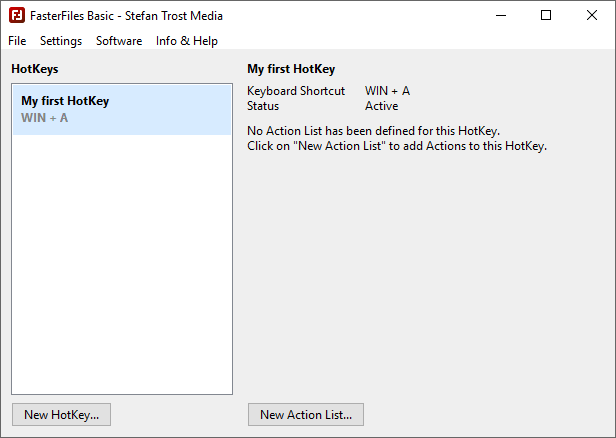
First, click on the HotKey on the left of the window. With this, we are selecting the HotKey so that we get information about it on the right.
In the next step, click on the button "New Action List" and select a name for your Action List. In our example, we have called the Action List "My first Action List". After clicking on "Save", the window has changed to:
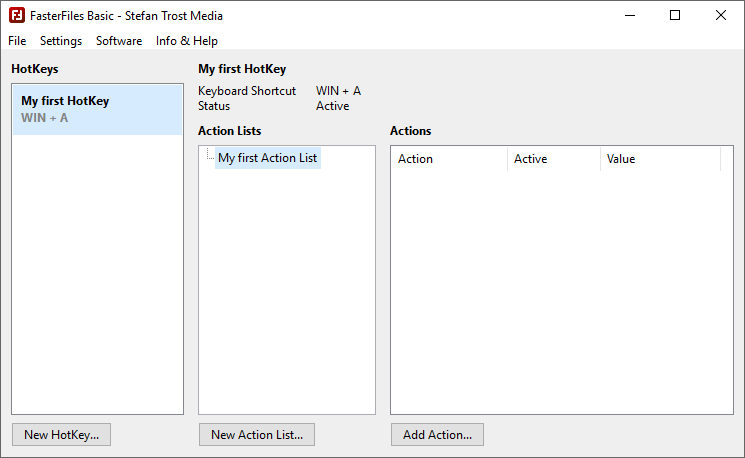
On the left, you can see a list of all HotKeys you have already created, in the middle the assigned Action Lists of the selected HotKey. With clicking on "New Action List", you can add further Action Lists to the selected HotKey. If you want to rearrange your Action Lists, you can use your mouse. If you want to edit the Action Lists, right click on the Action List in order to get the options. With selecting an Action List, the assigned actions will be displayed on the right.
Create Actions
Up to now, we have created our first HotKey and our first Action List. Now, we want to assign Actions to this Action List. For this, we are selecting the Action List in the window and we are clicking on the button "Add Action". Now, we see the following window:
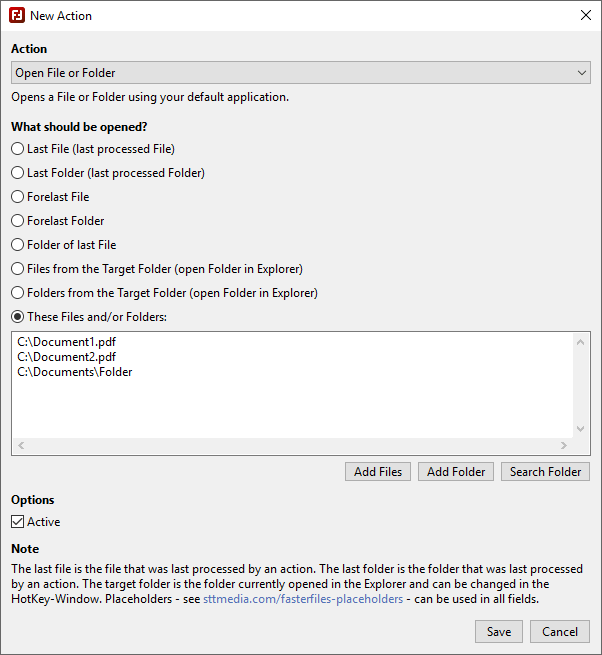
In this window, you can create all actions. First of all, you have to select the kind of action in the drop down box at the top of the window.
In our example, we would like to open some files and folders. Depending on the selected action, we get different options in the lower part of the window. In our case here, you can specify which files or folders should be opened. You can do that by writing, dropping or copying specific files or folders into the box (we have done that here) or you can select one of the options. The advantage of using the options is that you can for example are open to dynamic created file that name can be variable without knowing the exact path and name. Last, again, we have the possibility to set the action active or inactive and of course, we have the button "Save" with which we can create the action.
In this way, we can now add further actions to our Action List and we can use for example the options "Last File" or "Last Folder" to refer to each other.
An overview of all actions available and more information about the actions can be found on the page about actions.
Execute HotKey
We have now done all the things we need to use our first HotKey. Press the key combination you have assigned to your HotKey and try it out.
Because we have specified at the beginning that our HotKey should have multiple Action Lists and to those should be displayed within a selection dialog, we will see this selection window with all assigned Action Lists after pressing the keyboard shortcut:
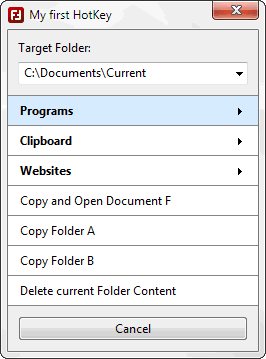
You can use your mouse or the arrow keys on your keyboard to navigate within the selection dialog. In order to start an Action List and in order to execute all lodged actions of this list after each other, you can click with your mouse onto one of the items or you can use the enter key of your keyboard.
In the example, you can see that some entries are bold and displayed with an arrow. That are Action Lists with subfolders. If you select one of those Action Lists, you get a new list containing the subordinated Action Lists. In the example, the folder "Programs" may contain some commands for executing applications that are grouped in this way. Action Lists you are using more often, can be directly set to the first level like the actions for copying files and folders in the screenshot. Of course, it is your own decision whether you would like to use sub folders at all and how you would like to name and order your Action Lists.
In the window above, you can also see the field "Target Folder". In this field, there is always the current opened Windows Explorer window displayed. Using the drop down menu, you can access all other opened Explorer windows and it is also possible to type in your own folders manually. This is the target folder for all actions working with a target folder. For example, you can define that some files should be copied into the target folder using the action "Copy Files or Folders", "Where should be copied to?" - Into the Target Folder. Depending on the folder in which you are executing this action, the corresponding files will be copied into this folder.
Running Faster Files in Background
If you do not want to keep the main window of Faster Files open all the time, you can just minimize the Windows. This makes Faster Files appearing as Tray-Icon in your Taskbar while the main window becomes invisible. Of course, the HotKeys will remain functional in this case. To get the main window back, you can just double click the tray icon.
Autostart
Do you want Faster Files available directly after system startup? Then you can go to the menu "Settings > System Integration > Auto Start > Configure". If you select the option "Auto Start as Tray Icon", Faster Files will start automatically with Windows so that your HotKeys will be available immediately. You can show the main window with a double click onto the icon in the tray.